mxnet基本使用以及模型加载与保存

mxnet变量和模型的加载及保存

安装

  • 主要使用py使用mxnet,在这里给出安装链接:https://mxnet.apache.org/install/index.html
  • mxnet十分轻便,它的依赖项也很少,甚至连opencv也可以不用,在这里给出ubuntu16.04下mxnet的源码安装方式(CPU版本):http://www.cnblogs.com/ibyte/p/6141832.html
  • 我之前在装win10+ubuntu16双系统的时候,一直提示安装失败,在这里需要注意:如果选择uefi启动,则ubuntu分区时需要建立efi分区;如果选择legacy启动,分区时需要建立/boot分区,其他的按照网上的教程走一般都没问题。uefi和legacy的区别的参考链接:http://www.360doc.cn/mip/686868692.html

变量

  • 变量表达式
1
2
3
4
5
6
7
import mxnet as mx
a = mx.sym.Variable("A")
b = mx.sym.Variable("B")
c = (a+b) / 10
d = c+1
print( d )
print( d.list_arguments() )
<Symbol _plusscalar0>
['A', 'B']
  • 赋值
1
2
3
4
5
6
7
8
9
10
import numpy as np
input_args = {}
input_args["A"] = mx.nd.ones( (10,), ctx=mx.cpu() )
input_args["B"] = mx.nd.ones( (10,), ctx=mx.cpu() )
executor = d.bind( mx.cpu(),
args=input_args,
grad_req="null")
print( executor.arg_dict )
input_args["A"][:] = np.random.rand(10,)
print( executor.arg_dict )
{'A': 
[ 1.  1.  1.  1.  1.  1.  1.  1.  1.  1.]
<NDArray 10 @cpu(0)>, 'B': 
[ 1.  1.  1.  1.  1.  1.  1.  1.  1.  1.]
<NDArray 10 @cpu(0)>}
{'A': 
[ 0.54413623  0.18858841  0.40857175  0.32337192  0.78876358  0.92130709
  0.89868963  0.33286947  0.20659173  0.58630645]
<NDArray 10 @cpu(0)>, 'B': 
[ 1.  1.  1.  1.  1.  1.  1.  1.  1.  1.]
<NDArray 10 @cpu(0)>}
  • 梯度计算
1
2
3
4
5
6
7
8
9
10
11
12
13
14
15
16
17
18
19
20
21
22
23
24
input_arguments = {}
input_arguments['A'] = mx.nd.ones((10, ), ctx=mx.cpu())
input_arguments['B'] = mx.nd.ones((10, ), ctx=mx.cpu())
# allocate space for gradients
grad_arguments = {}
grad_arguments['A'] = mx.nd.ones((10, ), ctx=mx.cpu())
grad_arguments['B'] = mx.nd.ones((10, ), ctx=mx.cpu())

executor = d.bind(ctx=mx.cpu(),
args=input_arguments, # this can be a list or a dictionary mapping names of inputs to NDArray
args_grad=grad_arguments, # this can be a list or a dictionary mapping names of inputs to NDArray
grad_req='write') # instead of null, tell the executor to write gradients. This replaces the contents of grad_arguments with the gradients computed.

input_arguments['A'][:] = np.random.rand(10,)
input_arguments['B'][:] = np.random.rand(10,)

executor.forward()
# in this particular example, the output symbol is not a scalar or loss symbol.
# Thus taking its gradient is not possible.
# What is commonly done instead is to feed in the gradient from a future computation.
# this is essentially how backpropagation works.
out_grad = mx.nd.ones((10,), ctx=mx.cpu())
executor.backward([out_grad]) # because the graph only has one output, only one output grad is needed.
print( out_grad )
  • 可以实现ndarray与numpy的转化
1
2
3
4
5
6
a = mx.ndarray.ones((1,6))
print( type(a) )
print(a)
b = a.asnumpy()
print(b)
print( type(b) )
<class 'mxnet.ndarray.ndarray.NDArray'>

[[ 1.  1.  1.  1.  1.  1.]]
<NDArray 1x6 @cpu(0)>
[[ 1.  1.  1.  1.  1.  1.]]
<class 'numpy.ndarray'>

mnist简单测试

参考链接:http://mxnet.incubator.apache.org/tutorials/python/mnist.html

MLP进行简单的测试

在这里使用简单的多层感知机进行手写数字的识别。

  • 初始化
1
2
3
4
5
6
import mxnet as mx
mnist = mx.test_utils.get_mnist()
# Fix the seed
mx.random.seed(42)
# Set the compute context, GPU is available otherwise CPU
ctx = mx.cpu() # if mx.test_utils.list_gpus() else mx.cpu()
INFO:root:train-labels-idx1-ubyte.gz exists, skipping download
INFO:root:train-images-idx3-ubyte.gz exists, skipping download
INFO:root:t10k-labels-idx1-ubyte.gz exists, skipping download
INFO:root:t10k-images-idx3-ubyte.gz exists, skipping download
  • 设置网络,在这里读取的数据,每张图像就是1X28X28,因此在mlp中需要将数据进行flatten的操作。
1
2
3
4
5
6
7
8
9
10
11
12
13
14
15
16
17
18
19
20
batch_size = 100
train_iter = mx.io.NDArrayIter(mnist['train_data'], mnist['train_label'], batch_size, shuffle=True)
val_iter = mx.io.NDArrayIter(mnist['test_data'], mnist['test_label'], batch_size)

data = mx.sym.var('data')
# Flatten the data from 4-D shape into 2-D (batch_size, num_channel*width*height)
data = mx.sym.flatten(data=data)

# The first fully-connected layer and the corresponding activation function
fc1 = mx.sym.FullyConnected(data=data, num_hidden=128)
act1 = mx.sym.Activation(data=fc1, act_type="relu")

# The second fully-connected layer and the corresponding activation function
fc2 = mx.sym.FullyConnected(data=act1, num_hidden = 64)
act2 = mx.sym.Activation(data=fc2, act_type="relu")

# MNIST has 10 classes
fc3 = mx.sym.FullyConnected(data=act2, num_hidden=10)
# Softmax with cross entropy loss
mlp = mx.sym.SoftmaxOutput(data=fc3, name='softmax')
1
print( train_iter.data[0][1][0].shape )
(1, 28, 28)
  • 开始训练
1
2
3
4
5
6
7
8
9
10
11
import logging
logging.getLogger().setLevel(logging.DEBUG) # logging to stdout
# create a trainable module on compute context
mlp_model = mx.mod.Module(symbol=mlp, context=ctx)
mlp_model.fit(train_iter, # train data
eval_data=val_iter, # validation data
optimizer='sgd', # use SGD to train
optimizer_params={'learning_rate':0.1}, # use fixed learning rate
eval_metric='acc', # report accuracy during training
batch_end_callback = mx.callback.Speedometer(batch_size, 500), # output progress for each 100 data batches
num_epoch=10) # train for at most 10 dataset passes
INFO:root:Epoch[0] Batch [500]    Speed: 6075.72 samples/sec    accuracy=0.123373
INFO:root:Epoch[0] Train-accuracy=0.245051
INFO:root:Epoch[0] Time cost=9.731
INFO:root:Epoch[0] Validation-accuracy=0.302000
INFO:root:Epoch[1] Batch [500]    Speed: 4684.01 samples/sec    accuracy=0.719022
INFO:root:Epoch[1] Train-accuracy=0.847980
INFO:root:Epoch[1] Time cost=13.896
INFO:root:Epoch[1] Validation-accuracy=0.863900
INFO:root:Epoch[2] Batch [500]    Speed: 5944.26 samples/sec    accuracy=0.885130
INFO:root:Epoch[2] Train-accuracy=0.914545
INFO:root:Epoch[2] Time cost=10.645
INFO:root:Epoch[2] Validation-accuracy=0.921700
INFO:root:Epoch[3] Batch [500]    Speed: 6619.51 samples/sec    accuracy=0.928563
INFO:root:Epoch[3] Train-accuracy=0.938283
INFO:root:Epoch[3] Time cost=8.706
INFO:root:Epoch[3] Validation-accuracy=0.942400
INFO:root:Epoch[4] Batch [500]    Speed: 7503.70 samples/sec    accuracy=0.946168
INFO:root:Epoch[4] Train-accuracy=0.952929
INFO:root:Epoch[4] Time cost=9.081
INFO:root:Epoch[4] Validation-accuracy=0.951900
INFO:root:Epoch[5] Batch [500]    Speed: 4634.94 samples/sec    accuracy=0.956407
INFO:root:Epoch[5] Train-accuracy=0.960505
INFO:root:Epoch[5] Time cost=12.318
INFO:root:Epoch[5] Validation-accuracy=0.958800
INFO:root:Epoch[6] Batch [500]    Speed: 5837.38 samples/sec    accuracy=0.963353
INFO:root:Epoch[6] Train-accuracy=0.967172
INFO:root:Epoch[6] Time cost=10.757
INFO:root:Epoch[6] Validation-accuracy=0.963700
INFO:root:Epoch[7] Batch [500]    Speed: 5172.47 samples/sec    accuracy=0.969301
INFO:root:Epoch[7] Train-accuracy=0.971717
INFO:root:Epoch[7] Time cost=10.688
INFO:root:Epoch[7] Validation-accuracy=0.968500
INFO:root:Epoch[8] Batch [500]    Speed: 7146.53 samples/sec    accuracy=0.973174
INFO:root:Epoch[8] Train-accuracy=0.974949
INFO:root:Epoch[8] Time cost=8.348
INFO:root:Epoch[8] Validation-accuracy=0.970200
INFO:root:Epoch[9] Batch [500]    Speed: 7471.18 samples/sec    accuracy=0.976926
INFO:root:Epoch[9] Train-accuracy=0.978081
INFO:root:Epoch[9] Time cost=8.914
INFO:root:Epoch[9] Validation-accuracy=0.971600
  • 测试
1
2
3
4
5
6
7
8
9
10
test_iter = mx.io.NDArrayIter(mnist['test_data'], None, batch_size)
prob = mlp_model.predict(test_iter)
assert prob.shape == (10000, 10)

test_iter = mx.io.NDArrayIter(mnist['test_data'], mnist['test_label'], batch_size)
# predict accuracy of mlp
acc = mx.metric.Accuracy()
mlp_model.score(test_iter, acc)
print(acc)
assert acc.get()[1] > 0.96, "Achieved accuracy (%f) is lower than expected (0.96)" % acc.get()[1]
EvalMetric: {'accuracy': 0.97160000000000002}

CNN(LeNet)

  • 网络搭建,因为数据是4D的,因此在CNN中直接使用即可。
1
2
3
4
5
6
7
8
9
10
11
12
13
14
15
16
17
data = mx.sym.var('data')
# first conv layer
conv1 = mx.sym.Convolution(data=data, kernel=(5,5), num_filter=20)
tanh1 = mx.sym.Activation(data=conv1, act_type="tanh")
pool1 = mx.sym.Pooling(data=tanh1, pool_type="max", kernel=(2,2), stride=(2,2))
# second conv layer
conv2 = mx.sym.Convolution(data=pool1, kernel=(5,5), num_filter=50)
tanh2 = mx.sym.Activation(data=conv2, act_type="tanh")
pool2 = mx.sym.Pooling(data=tanh2, pool_type="max", kernel=(2,2), stride=(2,2))
# first fullc layer
flatten = mx.sym.flatten(data=pool2)
fc1 = mx.symbol.FullyConnected(data=flatten, num_hidden=500)
tanh3 = mx.sym.Activation(data=fc1, act_type="tanh")
# second fullc
fc2 = mx.sym.FullyConnected(data=tanh3, num_hidden=10)
# softmax loss
lenet = mx.sym.SoftmaxOutput(data=fc2, name='softmax')
  • 进行训练,如果没有gpu的话,可能会很慢
  • 注意:在fit的时候,因为会提供train_iter,因此不需要进行bind的操作
1
2
3
4
5
6
7
8
9
lenet_model = mx.mod.Module(symbol=lenet, context=ctx)
# train with the same
lenet_model.fit(train_iter,
eval_data=val_iter,
optimizer='sgd',
optimizer_params={'learning_rate':0.1},
eval_metric='acc',
batch_end_callback = mx.callback.Speedometer(batch_size, 100),
num_epoch=1)
INFO:root:Epoch[0] Batch [100]    Speed: 358.58 samples/sec    accuracy=0.107822
INFO:root:Epoch[0] Batch [200]    Speed: 459.82 samples/sec    accuracy=0.105900
INFO:root:Epoch[0] Batch [300]    Speed: 503.92 samples/sec    accuracy=0.113800
INFO:root:Epoch[0] Batch [400]    Speed: 466.81 samples/sec    accuracy=0.117500
INFO:root:Epoch[0] Batch [500]    Speed: 482.57 samples/sec    accuracy=0.114000
INFO:root:Epoch[0] Train-accuracy=0.110808
INFO:root:Epoch[0] Time cost=133.224
INFO:root:Epoch[0] Validation-accuracy=0.113500
1
2
3
4
5
6
7
8
test_iter = mx.io.NDArrayIter(mnist['test_data'], None, batch_size)
prob = lenet_model.predict(test_iter)
test_iter = mx.io.NDArrayIter(mnist['test_data'], mnist['test_label'], batch_size)
# predict accuracy for lenet
acc = mx.metric.Accuracy()
lenet_model.score(test_iter, acc)
print(acc)
assert acc.get()[1] > 0.98, "Achieved accuracy (%f) is lower than expected (0.98)" % acc.get()[1]
EvalMetric: {'accuracy': 0.97160000000000002}
  • 可以看出CNN的精度相比MLP更高。

  • 查看网络的一些信息,同时保存训练好的结果

1
2
3
keys = lenet_model.get_params()[0].keys()
print( keys )
lenet_model.save_checkpoint('./lenet/test',5) # 保存模型
INFO:root:Saved checkpoint to "./lenet/test-0005.params"


dict_keys(['convolution7_bias', 'convolution6_bias', 'convolution6_weight', 'fullyconnected19_weight', 'convolution7_weight', 'fullyconnected19_bias', 'fullyconnected18_weight', 'fullyconnected18_bias'])
  • 加载网络模型,并且进行训练
  • 注意:这里需要的是
    • 定义好的网络结构(lenet)
    • 定义好的网络模型(lenet_model)
    • 之前保存过程中的model_prefix('./lenet/test')num_epoch(5),这个与保存过程中使用的参数必须相同才可以。
    • 必须使用bind确定输入数据和输出数据的形状和格式,可以使用验证数据的data进行确定,也可以直接使用输入和输出的name和shape
1
2
3
4
5
6
7
8
9
10
11
12
13
14
15
16
17
18
19
20
21
22
23
24
25
26
27
28
29
30
31
32
33
34
35
data = mx.sym.Variable('data')
# first conv layer
conv1 = mx.sym.Convolution(data=data, kernel=(5,5), num_filter=20)
tanh1 = mx.sym.Activation(data=conv1, act_type="tanh")
pool1 = mx.sym.Pooling(data=tanh1, pool_type="max", kernel=(2,2), stride=(2,2))
# second conv layer
conv2 = mx.sym.Convolution(data=pool1, kernel=(5,5), num_filter=50)
tanh2 = mx.sym.Activation(data=conv2, act_type="tanh")
pool2 = mx.sym.Pooling(data=tanh2, pool_type="max", kernel=(2,2), stride=(2,2))
# first fullc layer
flatten = mx.sym.flatten(data=pool2)
fc1 = mx.symbol.FullyConnected(data=flatten, num_hidden=500)
tanh3 = mx.sym.Activation(data=fc1, act_type="tanh")
# second fullc
fc2 = mx.sym.FullyConnected(data=tanh3, num_hidden=10)
# softmax loss
lenet = mx.sym.SoftmaxOutput(data=fc2, name='softmax')

sym, arg_params, aux_params = mx.model.load_checkpoint('./lenet/test',5)

mod = mx.mod.Module(symbol=sym)

test_iter = mx.io.NDArrayIter(mnist['test_data'][0:100], mnist['test_label'], batch_size=20)
# you need to use bind func
# 使用bind函数指明输入输出
mod.bind(data_shapes=[('data', (20, 1,28,28))], label_shapes=[ ("softmax_label", (20,)) ])

# # init parameters
# mod.init_params()
# # assign the loaded parameters to the module
mod.set_params(arg_params, aux_params)

y = mod.predict( test_iter )
score = mod.score(test_iter, ['acc'])
print("Accuracy score is %f" % (score[0][1]))
Accuracy score is 0.140000

UCI-letters recognition using MLP

reference : https://mxnet.incubator.apache.org/tutorials/basic/module.html#save-and-load

  • import data
1
2
3
4
5
6
7
8
9
10
11
12
13
14
import logging
logging.getLogger().setLevel(logging.INFO)
import mxnet as mx
import numpy as np

mx.random.seed(1234)
fname = mx.test_utils.download('https://s3.us-east-2.amazonaws.com/mxnet-public/letter_recognition/letter-recognition.data')
data = np.genfromtxt(fname, delimiter=',')[:,1:]
label = np.array([ord(l.split(',')[0])-ord('A') for l in open(fname, 'r')])

batch_size = 32
ntrain = int(data.shape[0]*0.8)
train_iter = mx.io.NDArrayIter(data[:ntrain, :], label[:ntrain], batch_size, shuffle=True)
val_iter = mx.io.NDArrayIter(data[ntrain:, :], label[ntrain:], batch_size)
INFO:root:letter-recognition.data exists, skipping download
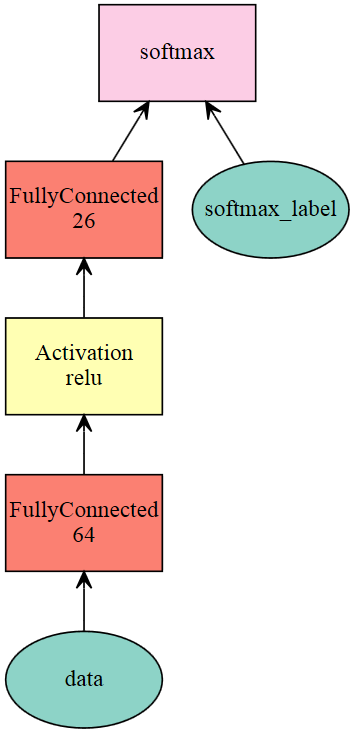
1
2
3
4
5
6
net = mx.sym.Variable('data')
net = mx.sym.FullyConnected(net, name='fc1', num_hidden=64)
net = mx.sym.Activation(net, name='relu1', act_type="relu")
net = mx.sym.FullyConnected(net, name='fc2', num_hidden=26)
net = mx.sym.SoftmaxOutput(net, name='softmax')
mx.viz.plot_network(net)

模型图

1
2
3
4
mod = mx.mod.Module(symbol=net,
context=mx.cpu(),
data_names=['data'],
label_names=['softmax_label'])
  • 使用比较底层的函数来训练数据
1
2
3
4
5
6
7
8
9
10
11
12
13
14
15
16
17
18
# allocate memory given the input data and label shapes
mod.bind(data_shapes=train_iter.provide_data, label_shapes=train_iter.provide_label)
# initialize parameters by uniform random numbers
mod.init_params(initializer=mx.init.Uniform(scale=.1))
# use SGD with learning rate 0.1 to train
mod.init_optimizer(optimizer='sgd', optimizer_params=(('learning_rate', 0.1), ))
# use accuracy as the metric
metric = mx.metric.create('acc')
# train 5 epochs, i.e. going over the data iter one pass
for epoch in range(5):
train_iter.reset()
metric.reset()
for batch in train_iter:
mod.forward(batch, is_train=True) # compute predictions
mod.update_metric(metric, batch.label) # accumulate prediction accuracy
mod.backward() # compute gradients
mod.update() # update parameters
print('Epoch %d, Training %s' % (epoch, metric.get()))
Epoch 0, Training ('accuracy', 0.43293749999999998)
Epoch 1, Training ('accuracy', 0.64149999999999996)
Epoch 2, Training ('accuracy', 0.69262500000000005)
Epoch 3, Training ('accuracy', 0.72768750000000004)
Epoch 4, Training ('accuracy', 0.75224999999999997)
  • 使用封装好的函数进行模型训练
1
2
3
4
5
6
7
8
train_iter.reset()

mod = mx.mod.Module( symbol=net,
context=mx.cpu(),
data_names=["data"],
label_names=["softmax_label"])

mod.fit( train_iter, eval_data=val_iter, optimizer_params={"learning_rate":0.1}, eval_metric="acc", num_epoch=8 )
INFO:root:Epoch[0] Train-accuracy=0.374500
INFO:root:Epoch[0] Time cost=0.473
INFO:root:Epoch[0] Validation-accuracy=0.594500
INFO:root:Epoch[1] Train-accuracy=0.627437
INFO:root:Epoch[1] Time cost=0.410
INFO:root:Epoch[1] Validation-accuracy=0.670500
INFO:root:Epoch[2] Train-accuracy=0.701750
INFO:root:Epoch[2] Time cost=0.412
INFO:root:Epoch[2] Validation-accuracy=0.722500
INFO:root:Epoch[3] Train-accuracy=0.745563
INFO:root:Epoch[3] Time cost=0.569
INFO:root:Epoch[3] Validation-accuracy=0.745000
INFO:root:Epoch[4] Train-accuracy=0.767813
INFO:root:Epoch[4] Time cost=0.479
INFO:root:Epoch[4] Validation-accuracy=0.741750
INFO:root:Epoch[5] Train-accuracy=0.784250
INFO:root:Epoch[5] Time cost=0.539
INFO:root:Epoch[5] Validation-accuracy=0.759750
INFO:root:Epoch[6] Train-accuracy=0.799250
INFO:root:Epoch[6] Time cost=0.478
INFO:root:Epoch[6] Validation-accuracy=0.781750
INFO:root:Epoch[7] Train-accuracy=0.809063
INFO:root:Epoch[7] Time cost=0.464
INFO:root:Epoch[7] Validation-accuracy=0.802500
  • list all the arguments to of the net
1
print( net.list_arguments() )
['data', 'fc1_weight', 'fc1_bias', 'fc2_weight', 'fc2_bias', 'softmax_label']
1
2
3
4
5
6
y = mod.predict( val_iter )
assert( y.shape == (4000,26) )

score = mod.score(val_iter, ['acc'])
print("Accuracy score is %f" % (score[0][1]))
assert score[0][1] > 0.77, "Achieved accuracy (%f) is less than expected (0.77)" % score[0][1]
Accuracy score is 0.802500
  • save model
  • it saved parameters at each epoch, but just save one json file.
1
2
3
4
5
6
# construct a callback function to save checkpoints
model_prefix = 'mlp/mlp_letter'
checkpoint = mx.callback.do_checkpoint(model_prefix)

mod = mx.mod.Module(symbol=net)
mod.fit(train_iter, num_epoch=5, epoch_end_callback=checkpoint)
INFO:root:Epoch[0] Train-accuracy=0.083312
INFO:root:Epoch[0] Time cost=0.464
INFO:root:Saved checkpoint to "mlp/mlp_letter-0001.params"
INFO:root:Epoch[1] Train-accuracy=0.256063
INFO:root:Epoch[1] Time cost=0.359
INFO:root:Saved checkpoint to "mlp/mlp_letter-0002.params"
INFO:root:Epoch[2] Train-accuracy=0.441625
INFO:root:Epoch[2] Time cost=0.413
INFO:root:Saved checkpoint to "mlp/mlp_letter-0003.params"
INFO:root:Epoch[3] Train-accuracy=0.547250
INFO:root:Epoch[3] Time cost=0.456
INFO:root:Saved checkpoint to "mlp/mlp_letter-0004.params"
INFO:root:Epoch[4] Train-accuracy=0.606625
INFO:root:Epoch[4] Time cost=0.425
INFO:root:Saved checkpoint to "mlp/mlp_letter-0005.params"
  • load the model and set params
  • 在这里没有进行训练,知道了网络的结构之后,直接使用sym对网络结构进行初始化,同时需要使用bind函数,确定网络的输入与输出的大小。否则会提示在set之前需要bind
1
2
3
4
5
6
7
8
9
10
11
12
13
14
15
16
17
18
19
20
21
22
23
24
25
net = mx.sym.Variable('data')
net = mx.sym.FullyConnected(net, name='fc1', num_hidden=64)
net = mx.sym.Activation(net, name='relu1', act_type="relu")
net = mx.sym.FullyConnected(net, name='fc2', num_hidden=26)
net = mx.sym.SoftmaxOutput(net, name='softmax')
mx.viz.plot_network(net)

sym, arg_params, aux_params = mx.model.load_checkpoint(model_prefix, 3)
assert sym.tojson() == net.tojson()

mod = mx.mod.Module(symbol=sym)
# you need to use bind func to
mod.bind(data_shapes=val_iter.provide_data, label_shapes=val_iter.provide_label)

# init parameters
# mod.init_params()

# assign the loaded parameters to the module
mod.set_params(arg_params, aux_params)

y = mod.predict( val_iter )
assert( y.shape == (4000,26) )

score = mod.score(val_iter, ['acc'])
print("Accuracy score is %f" % (score[0][1]))
Accuracy score is 0.496000
  • resume training from a saved checkpoint
1
2
3
4
5
6
7
mod = mx.mod.Module(symbol=sym)
mod.fit(train_iter,
num_epoch=21,
arg_params=arg_params,
aux_params=aux_params,
begin_epoch=3)
assert score[0][1] > 0.77, "Achieved accuracy (%f) is less than expected (0.77)" % score[0][1]
INFO:root:Epoch[3] Train-accuracy=0.547250
INFO:root:Epoch[3] Time cost=0.496
INFO:root:Epoch[4] Train-accuracy=0.606625
INFO:root:Epoch[4] Time cost=0.396
INFO:root:Epoch[5] Train-accuracy=0.649125
INFO:root:Epoch[5] Time cost=0.394
INFO:root:Epoch[6] Train-accuracy=0.684937
INFO:root:Epoch[6] Time cost=0.383
INFO:root:Epoch[7] Train-accuracy=0.709250
INFO:root:Epoch[7] Time cost=0.393
INFO:root:Epoch[8] Train-accuracy=0.722625
INFO:root:Epoch[8] Time cost=0.412
INFO:root:Epoch[9] Train-accuracy=0.732875
INFO:root:Epoch[9] Time cost=0.408
INFO:root:Epoch[10] Train-accuracy=0.740000
INFO:root:Epoch[10] Time cost=0.404
INFO:root:Epoch[11] Train-accuracy=0.747375
INFO:root:Epoch[11] Time cost=0.396
INFO:root:Epoch[12] Train-accuracy=0.753812
INFO:root:Epoch[12] Time cost=0.368
INFO:root:Epoch[13] Train-accuracy=0.758375
INFO:root:Epoch[13] Time cost=0.405
INFO:root:Epoch[14] Train-accuracy=0.763188
INFO:root:Epoch[14] Time cost=0.380
INFO:root:Epoch[15] Train-accuracy=0.767062
INFO:root:Epoch[15] Time cost=0.386
INFO:root:Epoch[16] Train-accuracy=0.771938
INFO:root:Epoch[16] Time cost=0.398
INFO:root:Epoch[17] Train-accuracy=0.776563
INFO:root:Epoch[17] Time cost=0.399
INFO:root:Epoch[18] Train-accuracy=0.781125
INFO:root:Epoch[18] Time cost=0.383
INFO:root:Epoch[19] Train-accuracy=0.786000
INFO:root:Epoch[19] Time cost=0.399
INFO:root:Epoch[20] Train-accuracy=0.790312
INFO:root:Epoch[20] Time cost=0.438